Eureka! I’ve Found It!
Published November 25, 2024
It’s taken me quite some time to figure out a project that I’m passionate about—one that solves a real-world problem and combines two things I love: Barbados and coding.
The Problem: Not Knowing Where to Go for Food (or How to Order It)
Food is such an integral part of experiencing a culture, yet finding it can often be a challenge. Here are the three scenarios that inspired me to tackle this issue:
Case 1: My Personal Experience
I travel to Barbados several times a year, and yet I often don’t know where to get food. What are the hours? What forms of payment do they accept? Where’s the menu? Most of the time, I end up calling someone for recommendations—frustrating when you’re hungry and short on time.
Case 2: Visitors to the Island
Tourists coming to Barbados often face the same dilemma. They don’t know who to call, and they might want to explore food spots off the beaten path. What resources are available to help them?
Case 3: Social Media Complaints
Scrolling through social media, I’ve seen numerous visitors to Barbados sharing disappointing experiences about food. Whether it was the type of food they tried or the limited options they found, the issue usually boiled down to a lack of accessible information.
The Solution: A Comprehensive Food Directory App
My vision is to build a food directory app that connects locals, tourists, and vendors. It will go beyond listing restaurants and provide actionable, real-time information to solve these common issues.
Key Features:
- Geo-tagging: Vendors can mark their exact location so customers can easily find them.
- Essential Information: Details like operating hours, payment methods, and menus.
- User-Friendly Interface: Designed for ease of use by locals and visitors alike.
- Searchable Options: Filter by cuisine, dietary preferences, or proximity.
Problems Solved:
- Where can I get food?
- How do I order food?
- What are their hours?
- What forms of payment do they accept?
- Where exactly are they located?
This app bridges the gap between food vendors and customers, ensuring that no one misses out on the incredible culinary experiences Barbados has to offer. Stay tuned as I document my journey of turning this idea into reality!
Let's Get Organized
Published December 4, 2024
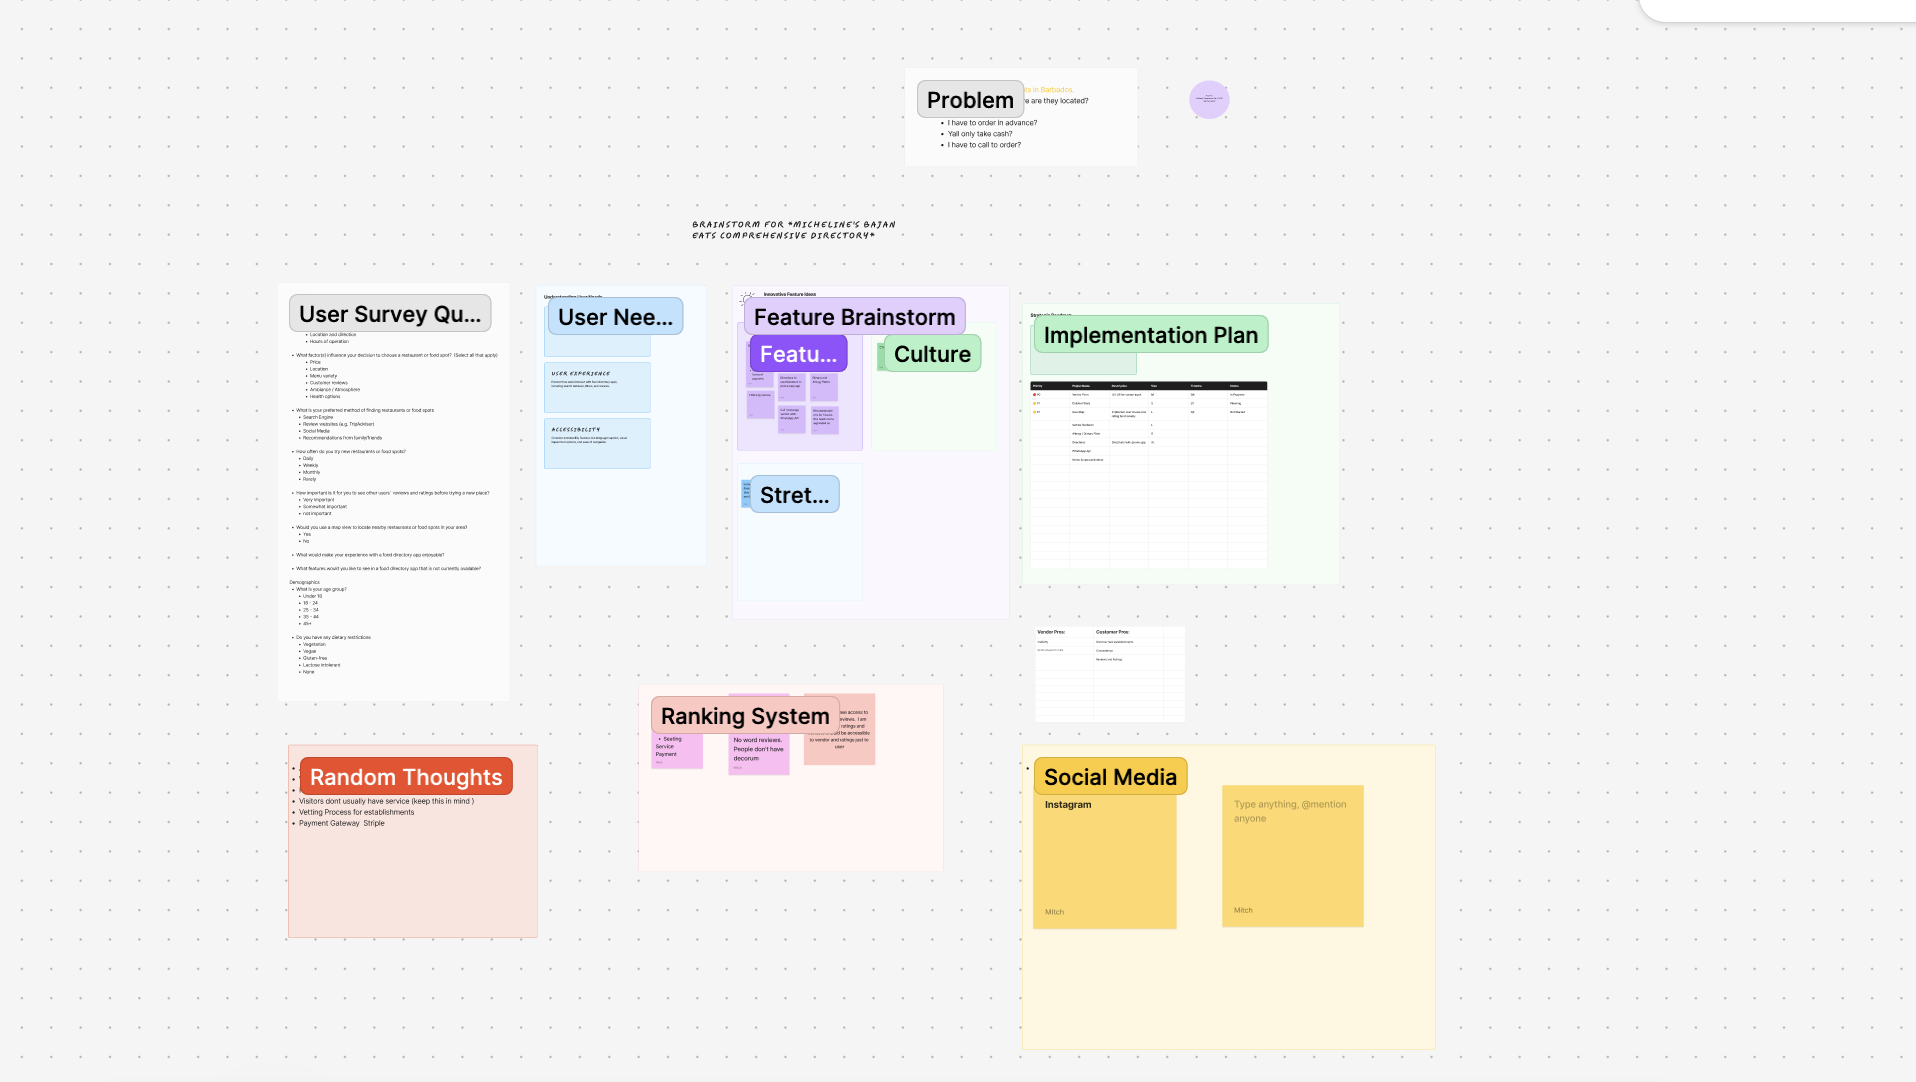
When I first started thinking about the app, my ideas were all over the place—sticky notes, random thoughts, and a few scattered sketches in a notebook. I needed a way to pull everything together into a clear vision. That’s where Figma Jam came in.
How Figma Jam Helped Me Brainstorm
- Mind Mapping: I created a mind map to break down the app’s purpose, features, and user needs. The flexibility of dragging and dropping shapes made it easy to visually connect ideas.
- Collaborative Space: Even though I’m working solo, Figma Jam’s collaborative nature allowed me to organize my thoughts in a dynamic space that I could revisit and refine.
- Sticky Notes Galore: I used sticky notes to capture user scenarios, like tourists struggling to find food or locals exploring hidden gems. Each note became a mini story that helped shape the app’s features.
By the end of my Figma Jam session, I had a solid outline of what the app should be and the problems it would solve.
Building a User-Centered App: How I Defined My Target Audience
December 18, 2024
When I set out to create my app, I knew that defining my target
audience would be crucial to building a successful, user-centered app. Understanding who I’m
building for has influenced every decision—from the features I prioritize to the way I structure
the app’s interface. Here’s how I approached defining my target audience and why it’s made all the difference.
Every great app begins with solving a problem. For me, the problem was clear: people (myself included) struggling
to find food options in Barbados. Whether it’s not knowing where to go, when places are open, or how to order,
this gap needed filling. From there, I broke down the potential users into groups based on their needs.
Identify User Groups
After identifying the problem, I thought about who might benefit from the app and what their pain points are. Here are the primary groups I targeted:
Locals
Locals know the island better than anyone, but even they face challenges like:
- Finding new or lesser-known food vendors.
- Getting accurate information about hours, menus, and payment methods.
Tourist
Visitors to Barbados often struggle to navigate the food scene, especially if they want to explore beyond resorts. They need:
- Easy-to-find food options that match their preferences.
- Directions and clear information in a centralized platform.
Food Vendors
The app isn’t just for customers, it’s for vendors too! They often rely on word of mouth or social media for marketing, which can be limiting. My app will help them:
- Reach a wider audience.
- Display essential information like menus, hours, and payment options.
Gather Feedback
To validate my assumptions, there is a big discourse on X (formerly 'Twitter') between locals and
visitors on food choices on the island. I started talking to potential users. I asked locals about their favorite food spots and
the challenges they face finding information. I also spoke with tourists about their experiences finding food on the island.
Vendors gave me insight into how they currently promote their businesses, some challenges they face and what they’d like to improve.
These conversations gave me a deeper understanding of user needs and highlighted features that would be most valuable.
Create User Personas
To keep my target audience in mind during the development process, I created user personas—fictional representations of my ideal users. Here’s two examples:
Name: Sarah, The Foodie Tourist
Age: 30
Needs: Sarah wants to explore authentic Barbadian food but struggles to find places outside the resort.
She needs an app that shows her nearby food spots, menus, and reviews.
Pain Points: Difficulty finding local spots with clear directions, hours, and payment methods.
Name: Kira, Local
Age: 28
Needs: Kira favorite food spot has permanently closed and she doesn't know what else, if anything
is currently open at this time.
Pain Points: Difficulty knowing what is currently open.
By putting a face to my users, I can stay focused on building features that serve their specific needs.
Why Defining My Audience Matters
Knowing my target audience has been a guiding light throughout building this app. It ensures that every decision
I make—whether it’s design, functionality, or content—is purposeful and centered around the people who
will actually use the app. By focusing on their needs, I’m confident that my app will not only solve the
problem but also enhance the food experience for locals, tourists, and vendors alike.
How I Prioritized Features for My Food Directory App
Published December 26, 2024
When I started building this app, I was brimming with ideas.
From geo-tagging food vendors to detailed menus and real-time reviews, every feature
felt essential. But as any developer knows, trying to build everything at once is
a recipe for diaster and an unfinished project.
So, I took a step back, reorganized my sticky notes in Figma Jam, and focused on
prioritization. In this post, I’ll walk you through how I decided which features to build first, and why.
Start With The Core Problem
The aim of the app is to solve a very real problem:
"People don’t know where to find food in Barbados, how to order it, or what payment methods are accepted."
I asked myself:
“If my app could only do ONE thing, what would it be?”
The answer was simple: Help people easily find food vendors and key information about them.
This clarity set the foundation for my MVP —a version of the app that solves the core problem.
Categorize Features Using a Priority Framework
To avoid feature creep, I used the MoSCoW Method that breaks features into four categories:
- Must-Have: Essential features for the app to fulfill its core purpose.
- Should-Have: Important, but not launch-critical.
- Could-Have: Nice additions, but can wait.
- Won’t-Have (for now): Ideas to revisit later.
Here’s how it looked for my app:
Must-Have:
- Searchable vendor directory
- Geo-tagging for vendor locations
- Vendor profiles with hours, menus, and payment info
Should-Have:
- User reviews and ratings
- Bookmark favorite vendors
Could-Have:
- Push notifications for vendor deals
- Real-time availability updates
Won’t-Have (for now):
- Loyalty programs
- In-app ordering system
This framework ensured I stayed focused on the Must-Have features while keeping the
rest on the roadmap for future iterations.
Validate with feedback
Ideas are great, but user feedback is better. I shared my feature list with a few friends, travellers and locals to see if the app
featuers aligned with their needs. Their feedback helped validate app priorities and gave me insight into features I hadn't considered.
For example:
- One user highlighted the importance of payment method transparency.
- Another pointed out the frustration of outdated vendor hours.
These insights reinforced the importance of clear, reliable vendor profiles.
Stay Flexible and Iterative
Prioritization isn’t a one-and-done task. As I build and test the app, I know new challenges and ideas will arise.
My plan is to:
- Launch with the Must-Have features.
- Gather feedback from real users.
- Iteratively add Should-Have and Could-Have features in future updates.
Lessons Learned from Prioritization
- Start small, but meaningful. An MVP that solves one problem well is better than an app that tries to do everything poorly.
- Listen to your users. Their needs should guide your decisions.
- Stay focused. Every feature must serve the core purpose of the app.
What's Next?
Now that I have a clear roadmap, I’m diving into building the core features using React Native.
It feels great to have clarity on what to build first, and I’m excited to see the app come to life.
Stay tuned for more updates as I continue to build and refine this app!
The Tools I'm Using to Build My App
Published January 23, 2025
Building my Barbados Food Directory app has been an exciting journey, and the
right tools have been key to turning my vision into reality. From brainstorming
ideas to writing code, these tools have streamlined my workflow and kept me
productive. Here’s a breakdown of the tools I’m using and how they fit into my
development process.
1. Figma and Figma Jam: For Brainstorming and Wireframes
Before writing a single line of code, I needed a clear idea of how the app would
function and look. That’s where Figma and Figma Jam came in.
Figma Jam: I used Figma Jam to map out my ideas and organize my thoughts visually. From user personas to feature prioritization, it helped me clarify the app’s purpose and flow.
Figma: Once I had my ideas structured, I moved on to wireframing the app. Figma’s drag-and-drop tools made it easy to design intuitive layouts for the home screen and vendor profiles.
These tools gave me a visual blueprint of the app and set a strong foundation for the development phase.
2. React Native: The Core of My App
To build the app, I chose React Native, a popular framework for developing cross-platform mobile apps. Here’s why:
- Cross-Platform Development: React Native allows me to write code once and deploy it to both iOS and Android.
- Active Ecosystem: With a rich library of third-party packages, I can integrate features like navigation and geo-tagging seamlessly.
- Community Support: React Native’s large community means there’s plenty of documentation and resources to help solve problems quickly.
3. Visual Studio Code (VS Code): My Code Editor
VS Code is my go-to code editor for writing React Native. Its lightweight design and powerful extensions make coding efficient and enjoyable.
Key Extensions I Use:
- Prettier: Automatically formats my code for consistency.
- ESLint: Ensures my code adheres to best practices and catches potential errors.
- React Native Tools: Provides debugging features and React Native-specific utilities.
4. NPM: For Dependency Management
I’m using NPM to manage the app’s dependencies. It’s fast, reliable, and integrates seamlessly with React Native.
5. Expo and React Native CLI: For Development and Testing
While I’m using React Native CLI for the project, Expo has been helpful for prototyping features.
Expo CLI: Useful for quickly testing ideas without worrying about native configurations.
React Native CLI: Provides full control over native code, which I’ll need for features like geo-tagging with the Google Maps API.
6. Git and GitHub: For Version Control
Version control is essential for any development project, and I’m using Git and GitHub to track changes and collaborate with potential contributors.
Git: Keeps a detailed history of my code, so I can roll back changes if needed.
GitHub: Hosts my repository and makes it easy to share the project.
Update: Built a Smart Apartment App with Dallas Software Developers Group
Published April 2, 2025
Over the past few weeks, I’ve had the incredible opportunity to be part of the Dallas Software Developers Group 2025 cohort—a program that
brings developers together to build meaningful, real-world applications. In just six weeks, my team and I collaborated to create a fully
featured smart apartment tenant app designed help with issues that most apartments face.
The Problem We Tackled
Many apartment complexes today are held back by disconnected systems, outdated processes, and slow communication between management and tenants.
Residents often find themselves juggling multiple platforms—or worse, relying on paper notices or phone calls—for things like reporting issues
or managing deliveries. Our goal was to change that.
The Solution: A Smart Apartment Tenant App
Together with six other developers, we built an app that centralizes tenant services into a single, seamless experience. Key features included:
- One Tap Reporting for issues.
- Smart Package Management to notify tenants of deliveries.
- Lease Signing
- Guest Parking Permits
- Smart Lock
- Guest Access Privileges
A central dashboard that brings everything together for a clean, modern user experience.
My Contributions
Working alongside an amazing team, I focused on:
One Tap Tenant Reporting UI
I designed the interface that lets tenants quickly report maintenance issues with just one tap.
Smart Package UI
I helped create the user interface for managing package deliveries—ensuring tenants receive real-time notifications when their packages arrive.
Dashboard Styling
I was in charge of styling the app's dashboard I focused on making it visually cohesive and user-friendly, ensuring a polished look that reflects the professionalism of the platform we built.
What I Learned
This project improved not only my technical skills but also my ability to work as part of a cross-functional team. I gained experience with:
- UI/UX best practices in real-world scenarios
- Collaborative workflows using Git and GitHub
- Working in sprints and managing scoped feature work under tight timelines
What's Done So Far
Published April 23, 2025
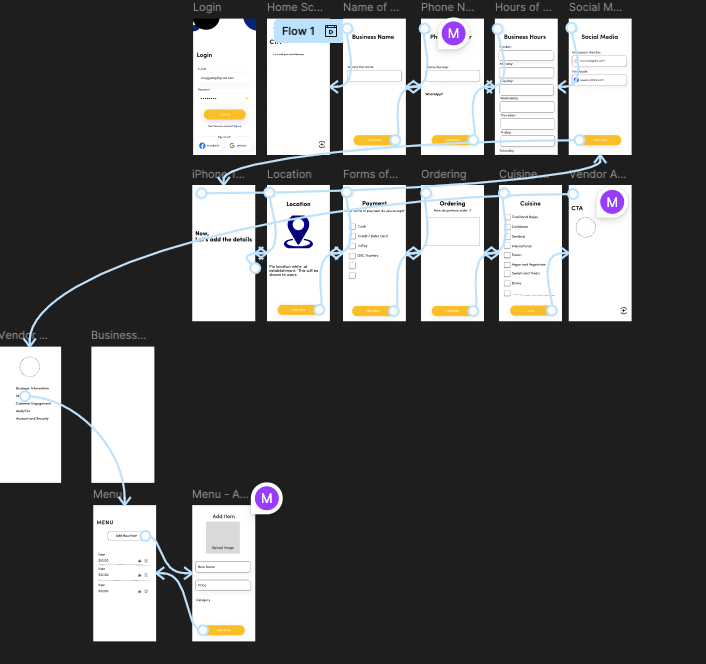
I’ve completed the visual design for the two core MVP features of the app: the Vendor Profile setup and the Menu management flow. This mockup was created in Figma and lays out the vendor’s experience from logging in to fully configuring their business profile.
Design Priorities:
- Simplicity: The UI is intentionally clean and straightforward, minimizing the learning curve for vendors.
- Step-by-step onboarding: The form flow breaks information into manageable chunks to keeps the users engaged and avoid them getting overwhelmed.
- Minimalist styling: The use of whitespace, icons, and large CTA buttons improves touch accuracy and keeps the experience mobile-first.
- Clarity in CTAs: "Next" and "Submit" buttons guide users through each step without friction.
Even though this is a high-fidelity mockup, I expect things to shift as I continue building the backend and gather user feedback—but the core flow is clear and focused on usability.